Monday, July 28, 2008

Suzuki Grand Vitara, SX4 : How to connect your iPod / MP3 Player (Auxiliary Port)

I bought a GV recently and was quite surprised to see the audio system not having an external line in connection. Googled and found out this site. Thanks to Griff, Steeleus and others, now we have a set of instructions on how to do this. This blog puts all that knowledge into a howto. This will work for your Suzuki Grand Vitara / Suzuki SX4 (2007 and later models) and others with the same Clarion head unit.
Here is how the head unit looks.


Clarion Audio, above the AC Controls

We need to carefully remove the head unit. For this you need to remove the shiny molded trim first. This is probably the trickiest part.

  • Take a small screw driver, wrap it in 2 to 4 layers of polythene sheet to avoid damaging the fittings.
  • Insert the screw driver carefully under the bottom of the shiny plastic trim ; push the screwdriver outwards gently. The molding will open - see pics below.


Covered screwdriver under the trim corner
Gently push out the Silver trim
  • Release the interlocks one by one, if necessary, using the screwdriver wrapped in polythene.

One trim is off
  • Follow the same procedure and remove the other trim too.


Both the trims are off now


  • Remove the top 5 screws on either side. You can leave the bottom two. Now carefully pull out the audio and AC controls panels. You will need to disconnect the antenna cable, the head unit connector, and the 2 AC unit connectors. The antenna cable is a single wire, you can yank it out. All the others have a release tab in the middle of the connector, press it down and pull out the connector. Do not pull the wires, pull the connector while pressing down the release tab in the middle.

4 Connectors removed from Panel
Press the release tab and pull to detach


Head Unit

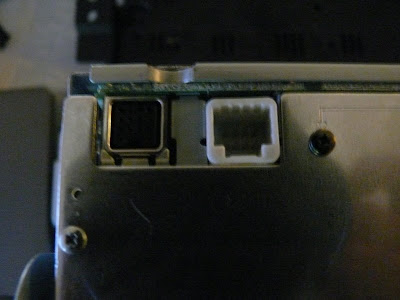
Connectors behind the head unit
  • The white connector above is the one we are interested in. The pin-out for the same is below.

Suzuki Vitara / SX4 Aux Connector Pin Out
  • You need a connector to get to these pins. After hunting around, I found out that the connector that mates a PC mother board USB port header pins to the USB port itself on the PC Cabinet, will fit the bill. More about this connector here. (See the note on connector at the end of the howto, for an alternate connector). Your friendly neighborhood PC repair person will be able to give you one. You will also need to get a 1k to 2k Resistor from the electronics store, if you don't have one in your electronics junk box. See the connectors (2 rows) below.


USB cable used to connect to the head unit


  • You now need to get a stereo jack and cable like the one below and cut off one end of the cable. This coule be an RCA to audio jacks that you can find in any audio store, cut out the RCA end. We will now need to insert the cut end of the cable through the Sun Glass compartment below the 4H-4L Lock knob. See the figure below; we are going to thread the cable through this (The Jack is in the Box lable below) area, so that we dont have to drill holes to bring up the cable.

Sun Glass Compartment
  • Open your sun glass compartment by pressing that button below the label.
    There is a ready made slot behind this compartment. You can feel it if you probe for it in the open compartment. If you light up and look carefully you can see it too. See the picture below.


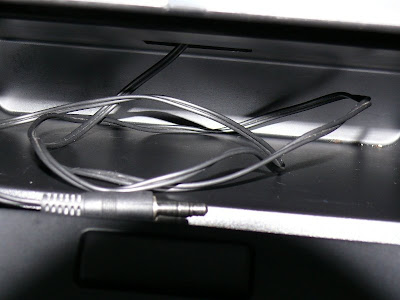
Cable inserted thru the slot

  • Insert the cut end of the cable through this slot. You are now ready to wire up the unit.
  • Connect the Resistor between Trigger 1 and Trigger 2, Connect the Audio Jack to the Left Right and Signal Ground Wires, solder the connections if you can. Insulate them - use a scotch tape; and tape the resistor to the back of the unit. You can cut off the unused wires.
  • Connect the antenna back first! Many of us have had to open up the unit after complete assembly, because the radio stopped working - forgot to connect up the antenna connector. Now connect back the audio unit (one connector more), AC Power and AC Controls cables. Switch on your car ignition and press the CD button on the Audio head unit. You should see the result of your hard work now (see pic below)!

AUX Success!


  • Connect your MP3 player line out to the stero jack, turn up the volume and ensure both Left and Right channels are fine. Also tune into your favourite radio station to ensure Radio is functional. Start the Car and check your AC unit is functioning normally. If the AC Control or Power is not properly connected, you will see a "System Check" message on the display.
  • Once you are sure all systems are fine, switch off the car, and screw back the panel properly. Put the Silver Trims, starting from the top and working your way back down to the bottom edge.

Everything is back to normal with the Added AUX!


Note on the Audio Connector:
Instead of the Digital USB connector above, you can use a good low noise analog connector if you are willing to do little fine work. This is the connector where the 3rd pin is blank. This is the one used to connect the CD Audio from a CD driver to the motherboard audio header. You will have to cut out the blank 3rd row and insert the 4th row on to the Trigger 2 Pin on one of the connectors.

Monday, July 21, 2008

Auto wake-up and shutdown for the OpenSolaris ZFS NAS

Now that you have set up your NAS, here are some tips to save power and switch it on/off remotely.

First, lets change the default wait time for boot that grub takes. From the console, run:
dp@zfs.local:~# bootadm list-menu
The location for the active GRUB menu is: /boot/grub/menu.lst
bootadm: no matching entry found
dp@zfs.local:~# cat /boot/grub/menu.lst
# For zfs root, menu.lst has moved to /rpool/boot/grub/menu.lst.

Interesting. We can use bootadm again to change the timeout or directly edit /rpool/boot/grub/menu.lst. I did the second. Change the timeout parameter (default 30 seconds) to whatever you prefer - I set it to 5 seconds, 0 will boot without querying. First three lines of my file are:

splashimage /boot/grub/splash.xpm.gz

timeout 5

default 0


We can auto shutdown the NAS box for the night and save some power. Use cron to do this.

dp@zfs.local:~# crontab -e


and add the following line to the end of the file.

30 23 * * * shutdown -y -i 5 -g 120 "System coming down for the night"


The 30 23 * * * is minutes, hours, day, week, month : so that statment means at 23:30 hours every day of the week, every week of the month, every month of the year (simply put, every day) shutdown the machine.

You can ofcourse execute the shutdown command from a Putty console on your Windows machine to shutdown the NAS box whenever you want. The crontab entry ensures that the machine is shutdown, if you forget to do it manually.

To wake up the machine automatically, you will need to download one of the many wake on lan freeware from the web. I use this. You can download it here.

Copy this to your windows system directory. C:\Windows\System32 is preferred. We get the mac address of your ZFS NAS box in the next step below.

dp@zfs.local:~# ifconfig -a

lo0: flags=2001000849 mtu 8232 index 1

inet 127.0.0.1 netmask ff000000

rge0: flags=201000843 mtu 1500 index 2

inet 192.168.1.10 netmask ffffff00 broadcast 192.168.1.255


ether 0:1e:8c:15:94:a3


lo0: flags=2002000849 mtu 8252 index 1


inet6 ::1/128


The number after the ether 0:1e:8c:15:94:a3 -> that is my mac address for the ethernet card.
On the windows machine, create a wakeup.bat file in the Windows\System32 directory with the following (Make sure to change the mac address and ip address of the NAS box to what is appropriate for you.

echo off

echo Waking up ZFS server

c:\wol 001e8c1594d3


echo Sent Wake up Packet. Press Control-C to stop ping.


ping -t 192.168.1.10


Create a shortcut to this batch file on your windows Desktop, so you have it handy.

So now you have a NAS that you can fireup when you want and will automatically shutdown.

ZFS NAS for Home : A Mini Howto based on OpenSolaris 2008.5

One of my FreeNAS mirror disks packed up 2 weeks ago. It served me well for over 3 years. If you are looking to back up your home media and laptop files, boot from a small thumb drive and get reasonable support from the community, this FreeBSD based product is a good bet.

I decided to attempt an OpenSolaris NAS instead, motivated by Simons' Blogs here - main reason : ZFS. ZFS is the mother of all file systems, now open sourced by Sun. A dated summary here will give you a good idea.

Steps involved:

1. Check the Hardware compatibility list and ensure you have one of the motherboards listed there. This is going to save you huge amount of time, since if the board is not listed there, chances are high that you will have driver problems. You will also need 2 Large Disks (SATA/IDE) for storing data and one small 20 GB is more than enough or a GB Flash Drive for the operating system.

2. Download OpenSolaris from here. My version is 2005.8

3. Make a CD with the ISO. Need a tool for Windows? Go here

4. Boot with the LiveCD and follow the install process - this is going to take a while. Install on to a small disk or the flash drive. Here is the official install help.

5. Login as the user you created (not root), once the system boots up into the great looking desktop. Btw You will have to su, to become root every time. This is Role Based Access Control RBAC.

6. Do a sanity check on the drivers being ok ; go to
System->Administration-> Device Driver Utility Should show Driver Problems : 0

7. At this point I needed to assign a fixed ip address for my box; that needs the following two commands to be executed. (Disable Network Auto Magic nwam and enable the physical network adapter). Get a console from Applications->System Tools -> Terminal.

$ su

Password:
#disable svc:/network/physical:nwam
#enable svc:/network/physical:default

8. Now you can go to System->Administration->Network->Ethernet connection->Properties and fill in the static IP address you want to assign to your NAS.

9. I did not have internet access now. To get to the net edit /etc/resolv.conf (as su) and add the following 2 lines (or whatever is your preferred name servers) and save the file. The following name servers are opendns servers, they are great to keep your home network and kids safe.
nameserver 208.67.222.222
nameserver 208.67.220.220

You also need to edit /etc/nsswitch.conf, look for the line
hosts: files
and change it to
hosts: dns files

Once these two changes are done, you should be able to get on to the internet.

10. Go now to System->Administration->Package Manager and Search for smb and check all except the SUNWsmba and click the Install/Update button. This is to install CIFS so that Windows users can see the shares. Do not be tempted to Update All (See this link on why not), since this will kill your system - which did happen to me. More on recovering from that later.

11. Follow Simon's thread here from the Configuration section on, to set up the zpool and zfs shares. I did not edit the auto_master and auto_smb that the blog suggested.

12. Populate your data now. Once finished, take a snapshot of your stable environment by getting a console and issuing the command

#beadm create NAS-dd-mm-yy


This will ensure that you can always boot into an environement that you know is functional.

13. Just to make sure that you dont get into trouble with the Image Packaging System IPS, follow the instructions here to update package manager.

14. If you did break the system like I did with an Update All from the Package Manager GUI and rebooted to find their system dead; here is what can be done. (Recovery using Opensolaris Live CD)

a. Boot again from live CD and get into console. The username/password is jack/jack ; become su (password is opensolaris)

b. Issue following commands

#zpool import -f rpool

#zfs list

c, See if you can recognize any of the system snapshots that is a good enough starting point to recover. I had none, so I rolled back to the original install time snapshot by:

#zfs rollback -f rpool/ROOT/opensolaris@install


If you had a snapshot opensolaris@NAS-21-July-08 as recommended here, you can roll back to that and all will be well.

d. However if you rolled back to install time stuff, you need to redo steps 7, 8, 9 and 10; edit /etc/pam.conf and add the line as in Simons blog, create new users who were created post install and do a passwd again for all users to renew the passwords and reboot the system.

e. Once it comes up again, import the zpool that is the data pool (tank in my case);

#zpool import -f tank


f. and join the workgroup

#smbadm join -w WORKGROUP


You should be up and running now: Do not forget to execute the beadm given in step 12, so that you have a nice place to roll back from and not just the live CD install time snapshot!

Zimbletech is shipping free FileHide and SuperTuner Utilities

FileHide is a great Wireless Java Utility. You can download it here; and read more about the app and how to use here.

If you are musically inclined, SuperTuner will be a great tool. It helps you tune any instrument, using just your java enabled cellphone!

Wednesday, April 16, 2008

Tanpura (Tambura, Srutibox, drone) machine on your mobile.

Here is some free stuff for your mobile phone if you are an Indian musician. Tanpura Machine can be a reasonably good substitute for your digital Tanpura. You need a phone that can play MIDI files.

Leave a comment if you are having problems. Click here for details.

Karnataka Elections : Make sure your name is in the Electoral List

Here is a mini How to check if your name is in Bangalore Voters List.
Click Here
Fill in only 2 fields, Name: and Pin:
Chances are your full name will not show up since the spelling would be in error. If this happens, here is a what you do:
Enter only 2 fields as before. Enter the first 3 letters of your name (DIL for Dilip for example) in the Name: field and the Pin: as usual.
You are sure to get lots of matches now.
If your name is not there try alternate spelling for those three letters (eg: SANTI will most probably be spelled as SHANTHI, so you are better of looking for SHA too!)

More information about upcoming elections, here are some more links.
Details on Elections is available HERE.
See THIS LINK for details on date and which constituency
Procedure for getting / changin your name in voters list see this link.
Bangalore Urban Maps of Constituencies are HERE
Here is the Election Commission of India Page
for information about our democra(c/z)y.

The process of getting an EPIC (
Electors' Photo Identity Card ) is quite painful and there is total confusion all over. However, if your name is in the Electoral roll, all you need is a Govt. of India photo ID - Passport / PAN Card / Driving License / Ration Card, and you will be able to vote for the 2008 Karnataka elections.

Make sure your name is in the list AND VOTE! If you don't vote, chances are some one else will vote for you - and you don't want that!

Do leave a comment if you have more info or this post helped you.